本文对矢量瓦片规范进行简单解读,并讲述如何基于java springboot发布一个矢量瓦片服务,以及前端如何展现矢量瓦片。
矢量瓦片简介
矢量瓦片(mapbox-vector-tile,下简称mvt),是mapbox的一项伟大设计,它基于protobuf,设计了一套字节压缩规范,将矢量数据压缩成了瓦片格式。
之所以叫矢量瓦片,是因为它有别于图片格式的栅格瓦片,瓦片中存放了序列化为bytes的features,并且可以在前端反序列化回features。
矢量瓦片压缩规范
规范中有的概念比较晦涩,所以官方有给出了一篇可视化的描述文档,来描述数据的压缩过程
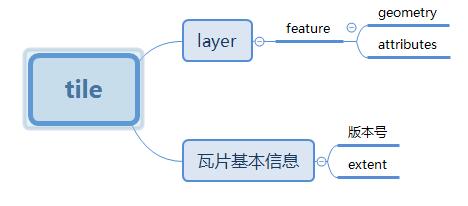
矢量瓦片包含了瓦片基本信息及若干图层,图层又包含了若干要素,而要素则由图形(geometry)和属性(attributes)组成:
geometry和attributes的压缩设计得非常精妙,下面结合官方可视化文档进行简单说明:
图形(geometry)的压缩
mvt为每个瓦片定义了一个瓦片坐标系,左上角坐标为(0, 0),右下角坐标为(4096, 4096)(严格来说,4096这个值是叫做extent,可以根据需要调整,为了方便叙述,本文中extent一律采用默认值4096)
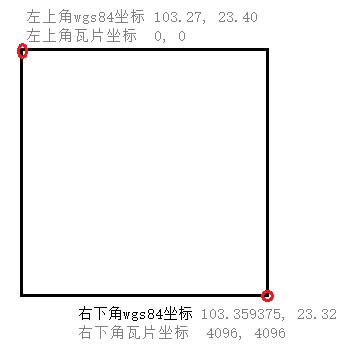
wgs84坐标系下的geometry,落在瓦片上时需要映射未瓦片坐标系。 例如,一条线段LINESTRING(103.31 23.35, 103.41 23.41)落在瓦片(z = 12, x = 3223, y = 1774)上时,
变成了LINESTRING(1795 2679, 6456 -367)
,具体的转换方式参考这段代码
值得注意的是,线段的第二个坐标并不在范围[0, 4096]内,因为mvt允许存在在瓦片范围外的坐标,以便处理一个跨瓦片的图形在两个瓦片交界处的连接问题。
与之对应,示例代码中的MvtCoordinateConvertor也允许在构造方法中传入指定的缓冲半径,以合理地切割图形在范围外的部分。
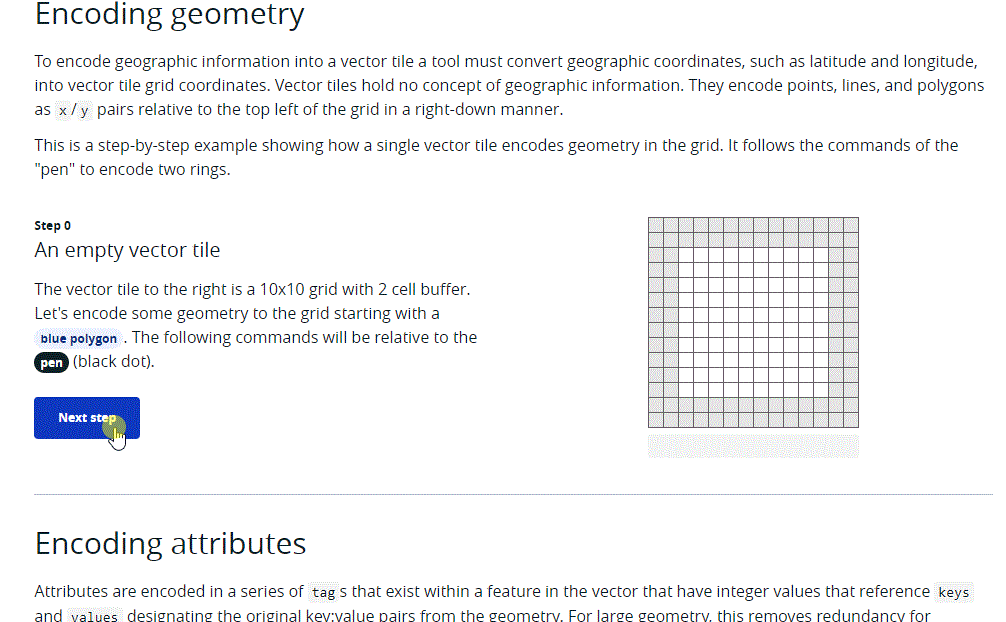
随后,mvt定义了一系列数值对应MoveTo、LineTo等操作,完成了geometry在瓦片上的绘制,如下图所示:
可见,mvt对geometry的压缩是一种有损压缩,extent越小压缩率越高、坐标精度越低,而extent=4096是一个在视觉上看不出误差且压缩率较好的一个取值。
属性(attributes)的压缩
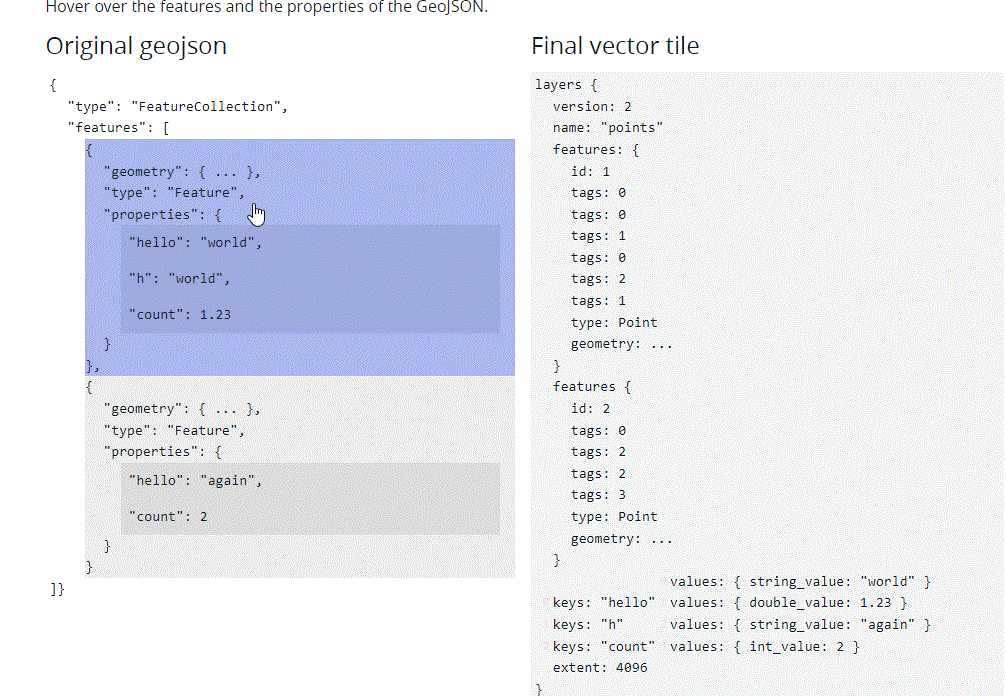
我们知道,属性是以key-value的形式存储的,在一组features中,key、value的值有很大比例是重复的,于是mvt定义了一个整数型字段tags,为key、value进行唯一编号,最大限度地压缩了空间占用,如下图所示:
矢量瓦片的优点
1、在瓦片包含的features数量不多的前提下,矢量瓦片在体积和渲染速度上都要优于栅格瓦片
2、由于数据是矢量的,给前端提供了很大的灵活性,例如在前端动态配置要素渲染样式,点击事件可以直接选中要素等等。
矢量瓦片的缺点
1、如果瓦片包含了太多的features,瓦片体积和渲染开销都会大幅提高。所以,我们需要合理规划好图层的展现层级,只在必要的层级展现对应的features。
2、矢量瓦片借助webgl渲染展现,对浏览器兼容性有一定要求,ie这种坑货肯定不行,就算是chrome内核,如果版本过低也会出现渲染颜色不对等问题。 另外,如果客户端没有GPU,那webgl会由CPU来模拟渲染,性能会下降许多。
发布和展现一个矢量瓦片图层
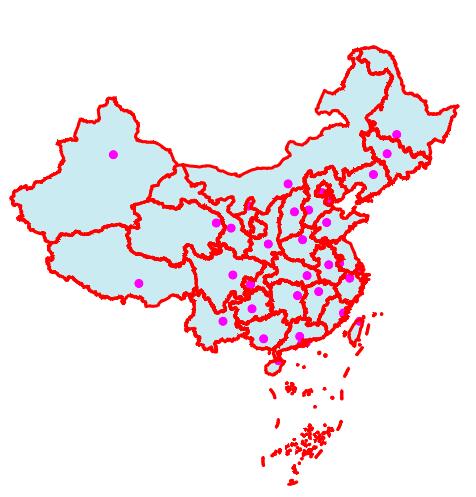
本节中,我们从阿里云数据可视化平台下载一份全国省份数据,构建一个包含三个图层的map
编写并发布一个矢量瓦片服务(java)
我们基于springboot,编写一个矢量瓦片服务 引入springboot的maven依赖以及giscat-mvt:
| <dependency>
<artifactId>giscat-vector-mvt</artifactId>
<groupId>org.wowtools</groupId>
<version>g1.6.1</version>
</dependency>
|
编写Controller,为了节约篇幅,这里把SpringBootApplication也写在同一个类中了
1
2
3
4
5
6
7
8
9
10
11
12
13
14
15
16
17
18
19
20
21
22
23
24
25
26
27
28
29
30
31
32
33
34
35
36
37
38
39
40
41
42
43
44
45
46
47
48
49
50
51
52
53
54
55
56
57
58
59
60
61
62
63
64
65
66
67
68
69
70
71
72
73
74
75
76
77
78
79
80
81
82
83
84
85
86
87
88
89
90
91
92
93
94
95
96
97
|
import org.locationtech.jts.geom.*;
import org.springframework.boot.SpringApplication;
import org.springframework.boot.autoconfigure.SpringBootApplication;
import org.springframework.web.bind.annotation.CrossOrigin;
import org.springframework.web.bind.annotation.PathVariable;
import org.springframework.web.bind.annotation.RequestMapping;
import org.springframework.web.bind.annotation.RestController;
import org.wowtools.giscat.vector.pojo.Feature;
import org.wowtools.giscat.vector.pojo.FeatureCollection;
import org.wowtools.giscat.vector.pojo.converter.GeoJsonFeatureConverter;
import javax.servlet.http.HttpServletResponse;
import java.io.IOException;
import java.io.OutputStream;
import java.util.ArrayList;
import java.util.Map;
@SpringBootApplication
@RestController()
@RequestMapping("/tile")
@CrossOrigin
public class WebDemo {
public static void main(String[] args) {
SpringApplication.run(WebDemo.class, args);
}
private static final FeatureCollection areaFeatureCollection;
private static final FeatureCollection lineFeatureCollection;
private static final FeatureCollection pointFeatureCollection;
private static final GeometryFactory geometryFactory = new GeometryFactory();
private static final String vtContentType = "application/octet-stream";
@RequestMapping("/{z}/{x}/{y}")
public void getTile(@PathVariable int z, @PathVariable int x, @PathVariable int y, HttpServletResponse response) {
MvtBuilder mvtBuilder = new MvtBuilder(z, x, y, geometryFactory);
MvtLayer layer = mvtBuilder.getOrCreateLayer("省区域");
for (Feature feature : areaFeatureCollection.getFeatures()) {
if (mvtBuilder.getBbox().envIntersects(feature.getGeometry())) {
layer.addFeature(feature);
}
}
layer = mvtBuilder.getOrCreateLayer("省边界");
for (Feature feature : lineFeatureCollection.getFeatures()) {
if (mvtBuilder.getBbox().envIntersects(feature.getGeometry())) {
layer.addFeature(feature);
}
}
layer = mvtBuilder.getOrCreateLayer("省会位置");
for (Feature feature : pointFeatureCollection.getFeatures()) {
if (mvtBuilder.getBbox().envIntersects(feature.getGeometry())) {
layer.addFeature(feature);
}
}
byte[] bytes = mvtBuilder.toBytes();
exportByte(bytes, vtContentType, response);
}
private void exportByte(byte[] bytes, String contentType, HttpServletResponse response) {
response.setContentType(contentType);
try (OutputStream os = response.getOutputStream()) {
os.write(bytes);
os.flush();
} catch (org.apache.catalina.connector.ClientAbortException e) {
} catch (IOException e) {
throw new RuntimeException(e);
}
}
}
|
完整的服务端代码在这里
启动后,我们便成功发布了一个矢量瓦片服务http://localhost:8080/tile/{z}/{x}/{y}
编写前端
新建一个空白地图,然后添加刚才发布的服务为数据源,再添加图层即可:
1
2
3
4
5
6
7
8
9
10
11
12
13
14
15
16
17
18
19
20
21
22
23
24
25
26
27
28
29
30
31
32
33
34
35
36
37
38
39
40
41
42
43
44
45
46
47
48
49
50
51
52
53
54
55
56
57
58
59
60
61
62
|
const map = new mapboxgl.Map({
container: 'map',
style: {
"version": 8,
"sources": {},
"layers": []
},
center: [102.712251, 25.040609],
zoom: 4
});
map.on('load', function () {
map.addSource('tile', {
"type": "vector",
"tiles": [
'http://localhost:8080/tile/{z}/{x}/{y}'
],
"minZoom": 1,
"maxZoom": 22
})
map.addLayer({
"id": "area-layer",
"type": "fill",
"source": "tile",
"source-layer": "省区域",
"layout": {"visibility": "visible"},
"paint": {"fill-color": '#51bbd6', "fill-opacity": 0.3, "fill-outline-color": '#0000ff'}
})
map.addLayer({
"id": "point-layer",
"source": 'tile',
"source-layer": "省会位置",
"type": "circle",
"paint": {
"circle-color": "#FF00FF",
"circle-radius": 5
}
});
map.addLayer({
"id": "route",
"type": "line",
"source": 'tile',
"source-layer": "省边界",
"layout": {
"line-join": "round",
"line-cap": "round"
},
"paint": {
"line-color": "#FF0000",
"line-width": 3
}
});
map.on('click', 'area-layer', (e) => {
console.log(e.features[0])
})
})
|
完整的前端代码在这里
展现效果如下: